Setup data disks on Azure VM and Fix broken FSTAB
by Lord_evron
This is a quick guide on how to configure extra data drives to ubuntu/linux machine on azure, to get automatically mounted on startup using the shell. Also, I will explain how to fix the boot process in case you mess up with the fstab file and the VM will not boot anymore.
Let’s start with the easy setup. Once that you deployed an Ubuntu VM (or any other linux distro), you can attach a disk to the machine. However, this disk is not formatted or mounted, and you cannot use it yet for your application. In order to make it “usable” we need to create a partition, format it and add an entry on the fstab so it get automatically mounted at startup. Let’s start to check what block devices you have attached. if you type:
lsblk
it will show the block devices attached to the machine as show in the example.
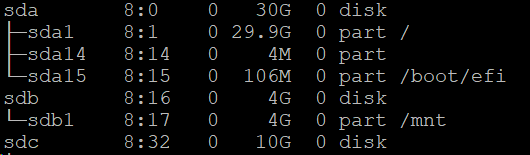
You can notice that “sda” is a disk that has already 3 partitions (sda1, sda14, sda15), while sdb has one partion and sdc has no partition.
you can also see the mounting points for each partition. You can see that sda1 is the root partition and the sdb is mounted as /mnt
(this is azure temp file partition used).
Now we need to create a partition on sdc. for doing so:
sudo fdisk /dev/sdc
# you can press m + "Enter" for the available commands
# Press o + "Enter" to create a new table
# Press n + "Enter" to create a new partition
# Press p + "Enter" (makes a primary partition)
# Select the partition number that you can to create. Press 1 + "Enter" to creates it as partition 1
# Select the start and End sector of the partition. If you want to make only 1 partition, then press two times "Enter"
# Press W + "Enter"  to write the changes to disk
now if you lsblk again, you will see that the sdc has a new partition called sdc1 similar to sdb in the picture.
After creating the partition , we need to create a filesystem on it. For creating a ext4 filesystem on sdc1 partition you can type:
sudo mkfs.ext4 /dev/sdc1
If everything goes well, now we have a new formatted drive with ext4 Filesystem in it, ready to be mounted and used.
At this point we could just issue a mount command, but that will not survive to reboot. We want to “mount” the disk always in the same path,
and make it persistent. For doing so we can edit the fstab file and add a new line in it.
sudo nano /etc/fstab
#in the file add the following line
/dev/sdc1  /home/username/extdisk    ext4    defaults    0    1

#save, exit and reboot
Than line will basically tell ubuntu to mount sdc1 on /home/username/extdisk. If you reboot and type lsblk you will see that the sdc1 will be
mounted to the correct path. If you want to make it even better you should substitute the /dev/sdc1 entry in the
FSTAB with the UUID of the partition. This is because in the rare case that you detach/reattach disks, or create new partitions and so on,
it can happen that the /dev/sdc1 is not anymore the partition that you meant in the first place.
So if you want to be sure that always the same partition get mounted then you can find the partition uuid with :
blkid
then substitute the /dev/sdc1 in fstab with the uuid. So the whole like will look like this:
UUID="13256777-abc1-11f3-b331-cb43fbb3d9b8" /home/username/extdisk ext4 defaults 0 1
This will make sure that your partition mounted is always the same.
If you did everything fine, this is the end of the article.. If you did screw it up because you misspelled something in FSTAB and you rebooted continue reading :). So, if you are reading this, either you are curious (very good) or you made a mistake and your VM does not boot anymore (also good, so you learn more).
From azure panel you can go on the VM page… on the side you will see “boot diagnostic”: click it. This will show you screenshot of the booting process… this can be useful in some cases… but in our case, we already know the problem… we need to re-edit the fstab … So for fixing it, you can click the entry called “serial console” (4 entries down from boot diagnostic)… The serial console will drop you a root shell on the VM and from there you will be able to re-open the fstab, save and reboot the system.
Repeat the process if necessary 🙂 .
I hope that this article was informative, and thank you for reading it…!
tags: technology - disk - azure - linux