Capturing Network Traffic with Raw Sockets in Python
by Lord_evron
In my previous article, I introduced some basic examples of socket programming in Python. Now, we’ll dive deeper into practical applications, specifically focusing on capturing and analyzing network traffic using raw sockets. This article will demonstrate how to capture packets at different layers of the network stack using these 2 example scripts, providing hands-on examples of how to parse/decode and understand the data packets on your network.
To better understand these examples, it’s important to briefly touch upon the OSI (Open Systems Interconnection) model. The OSI model is a conceptual framework that standardizes the functions of a telecommunication or computing system into a seven-layer abstraction. We’ll be primarily concerned with Layer 2 (Data Link) and Layer 3 (Network), as our examples will involve capturing Ethernet frames and IP packets, respectively. This layered approach allows us to examine network traffic at varying levels of detail, each offering unique insights into network communication. Read more about OSI model on wikipedia
Layer 2 Datagram Capture: AF_PACKET
Let’s begin with AF_PACKET.py, which uses:
socket.socket(socket.AF_PACKET, socket.SOCK_RAW, socket.htons(3))
and thus targets the Data Link Layer (Layer 2) of the OSI model. This script captures raw Ethernet frames, providing a full view of all network traffic on your local interface. The datagram we’re capturing is the standard Ethernet II frame, a common format used in local area networks. Visually, it can be represented as:

This frame encapsulates crucial information: the destination and source MAC addresses, identifying the sender and receiver; the EtherType, indicating the protocol within the payload (e.g., IPv4 or IPv6); the payload itself, containing the actual data; and the Frame Check Sequence (FCS), ensuring data integrity.
As shown in the code, AF_PACKET.py utilizes socket.AF_PACKET and socket.SOCK_RAW to capture these complete Ethernet frames. The script receives the entire frame, including the Ethernet header, any encapsulated IP/TCP/UDP headers, and the payload. Once we have the datagram, we can try to parse it.
Specifically, the line struct.unpack("!6s6sH", ethernet_header) is very important. This line unpacks the first 14 bytes of the Ethernet header.
The ! signifies network byte order (big-endian), ensuring consistent interpretation across different systems.
The 6s portions extract the 6-byte destination and source MAC addresses, while the H extracts the 2-byte EtherType.
EtherType indicate which protocol is encapsulated in the payload of the frame which might contain IPv4, AVTP, ARP, or other protocols.
For example, the script then continues parsing, specifically checking for EtherType == 0x0800, which corresponds to IP packets.
Upon detecting an IP packet, the script proceeds to parse the IP header with line struct.unpack("!BBHHHBBH4s4s", ip_header).
This allows us to extract information such as the source and destination IP addresses, the protocol number, and other IP header fields.
To illustrate further, consider the scenario where the IP packet encapsulates a UDP datagram, which is a Layer 4 protocol. Within the UDP datagram, we can extract the source and destination ports, the length of the UDP packet, and the checksum.
For example, if we have a captured UDP packet, we can use struct.unpack("!HHHH", udp_header) to unpack the UDP header.
Here, H represents an unsigned short (2 bytes), allowing us to extract the source port, destination port, length, and checksum, respectively.
Additionally, we can extract the UDP payload, which contains the application-level data.
This detailed parsing allows us to analyze network traffic at various layers, from the Ethernet frame to the application-level data within UDP packets.
This approach provides complete visibility into network traffic, allowing analysis of all protocols at Layer 2, but it requires manual parsing of headers and root privileges
Layer 3 Packet Capture: AF_INET
Now, let’s move to AF_INET.py, which uses:
raw_socket = socket.socket(socket.AF_INET, socket.SOCK_RAW, socket.IPPROTO_TCP)
and thus operates at the Network Layer (Layer 3) of the OSI model.
This script is designed to capture IP packets, specifically those containing TCP segments, offering a more targeted view of network traffic.
Unlike AF_PACKET.py, which captures raw Ethernet frames, AF_INET.py works directly with IP packets, eliminating the need for Ethernet header parsing.
To better understand the captured data, it’s helpful to visualize the IP packet format. The IP packet, captured by AF_INET.py, consists of a header and a payload. The header contains essential information for routing and packet handling. Visually, it can be represented as:
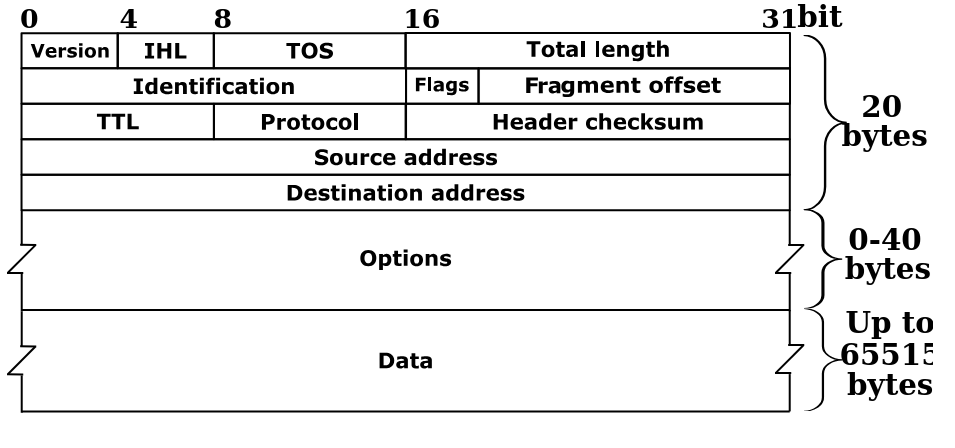
The header includes fields like the version, header length, differentiated services, total length, identification, flags, time-to-live (TTL), protocol, header checksum, source IP address, and destination IP address. These fields guide the packet through the network, ensuring it reaches its intended destination. The payload, following the header, contains the data from higher-layer protocols like TCP or UDP.
The script uses socket.AF_INET, socket.SOCK_RAW, and socket.IPPROTO_TCP to capture TCP packets. It binds to a specific IP address, capturing only traffic related to that address. This approach simplifies the capture process by filtering out non-TCP traffic and other IP protocols.
When a packet is captured, the script proceeds to parse the IP header. The line struct.unpack("!BBHHHBBH4s4s", ip_header) is crucial for this step since it parse the IP package. Some of you notice that is the same instruction as the previous case, and indeed it is, since also in the previus case we decoded an IP package. More in detail ! specifies network byte order, and the format string BBHHHBBH4s4s corresponds to the IP header fields: version, IHL, DSCP, ECN, total length, identification, flags, fragment offset, TTL, protocol, checksum, source IP, and destination IP. This parsing allows us to extract vital information such as the source and destination IP addresses, the protocol number, and other IP header fields.
The script further parses the TCP header (which again in on layer4 of the OSI), if the protocol number indicates a TCP packet. The line struct.unpack("!HHLLBBHHH", tcp_header) allows to extract the source port, destination port, sequence number, acknowledgement number, data offset, reserved bits, control flags, window size, checksum and urgent pointer. This allows to see the TCP communication.
As you can see in this case, we received directly an IP packet, and thus we eliminated the need to parse Ethernet headers and capturing only TCP traffic. However, like AF_PACKET.py, it requires root privileges and binding to a specific IP address.
Crucial Differences
It’s important to note the fundamental difference in how these scripts operate: AF_PACKET.py binds to a network interface, while AF_INET.py binds to an IP address. This happens because IP addresses exist only at the Network Layer (Layer 3), whereas interfaces operate at the Data Link Layer (Layer 2). Layer 2 deals with physical addressing and frame transmission, lacking the concept of IP addresses. Moving up to Layer 3, we encounter IP addresses, enabling routing and logical addressing. Finally, at Layer 4 (Transport), protocols like TCP and UDP introduce ports, allowing applications to multiplex and demultiplex data streams.
Essentially, AF_INET.py captures a specific subset of the traffic that AF_PACKET.py captures. With AF_PACKET.py, it is entirely feasible to filter and extract all IP packets, effectively replicating the functionality of AF_INET.py.
However, the reverse is not true. AF_INET.py, by design, can only capture IP packets. It is incapable of capturing non-IP traffic
such as RARP (Reverse Address Resolution Protocol) or ARP (Address Resolution Protocol) packets, which operate at or below the IP layer.
Therefore, AF_PACKET.py provides a more comprehensive view of network traffic, while AF_INET.py offers a more focused approach for analyzing IP-based communication.
By understanding these two approaches, you can gain a deeper view of network communication and develop powerful knowledge for network analysis.
Remember that these scripts are for foundational understanding of packet capture and parsing.
Tools like Wireshark offer a more robust and user-friendly experience for in-depth network analysis.
As always, I hope this article was useful!